Tuesday, June 30, 2015

Chocolate Ganche

Two Ingredients Create a Heavenly Companion to Any Cake


Last week, I posted my go-to chocolate cake recipe. What’s cake without frosting? Chocolate cake can be frosted and decorated in many different ways, my favorite is with a simple chocolate ganache.
As my loyal follower (hi Mom!) may have noticed, I am not a fan of complicated recipes that require a lot of ingredients and time. As the mother of six, I don’t have time to drive all over chasing down obscure ingredients. I love delicious food that can be made with few ingredients using a minimum number of dishes. The fewer, the better. However, I don’t believe in sacrificing taste for convenience. That is why I love this ganache recipe. It is made with just two ingredients and so versatile. It can be used as a fancy glaze or a fluffy frosting.
Ganache is made with equal parts chocolate and cream.
For an 8” double-layer cake, I prepare 4 cups of ganache.

Step One: Start with 16 oz. (2 cups) of chocolate. Any chocolate will work, but I get the best results with a high-quality dark chocolate bar. (My favorite is Trader Joe’s Belgian dark chocolate.) Coarsely chop it and place it in a large bowl. Chocolate chips can also be used. No chopping needed.
Chopping a chocolate bar can be tedious. If you are pressed for time, use chocolate chips.

Step Two: Measure two cups of heavy whipping cream. (I prefer to get my cream from a local dairy.) Heat it in a saucepan until it has nearly reached the boiling point (tiny bubbles will begin to form around the edge of the pan). If you’d prefer not to dirty more dishes, you can use the microwave. Heat the cream for 2 minutes.
I love this hormone and preservative-free whipping cream


Step Three: Once the cream is hot, pour it over the chocolate pieces.
I am amazed that three minutes can turn this mess into a gorgeous ganache

Step Four: Wait three minutes.

Step Five: Whisk the mixture until it is completely blended. If you want a beautiful chocolate glaze, wait a few minutes for the ganache to cool slightly, then carefully pour over the cake, smoothing and spreading as you go.
This makes a beautiful glaze

Step Six: For a fluffy frosting, more waiting is necessary. Refrigerate until the mixture is cool to the touch (approximately one hour). Using a hand mixer, beat the ganache on high speed until stiff peaks form.
The whipped ganache

Step Seven: Decorate the cake any way you desire.
As you can see, waiting for the ganache to reach the right temperature is very important.

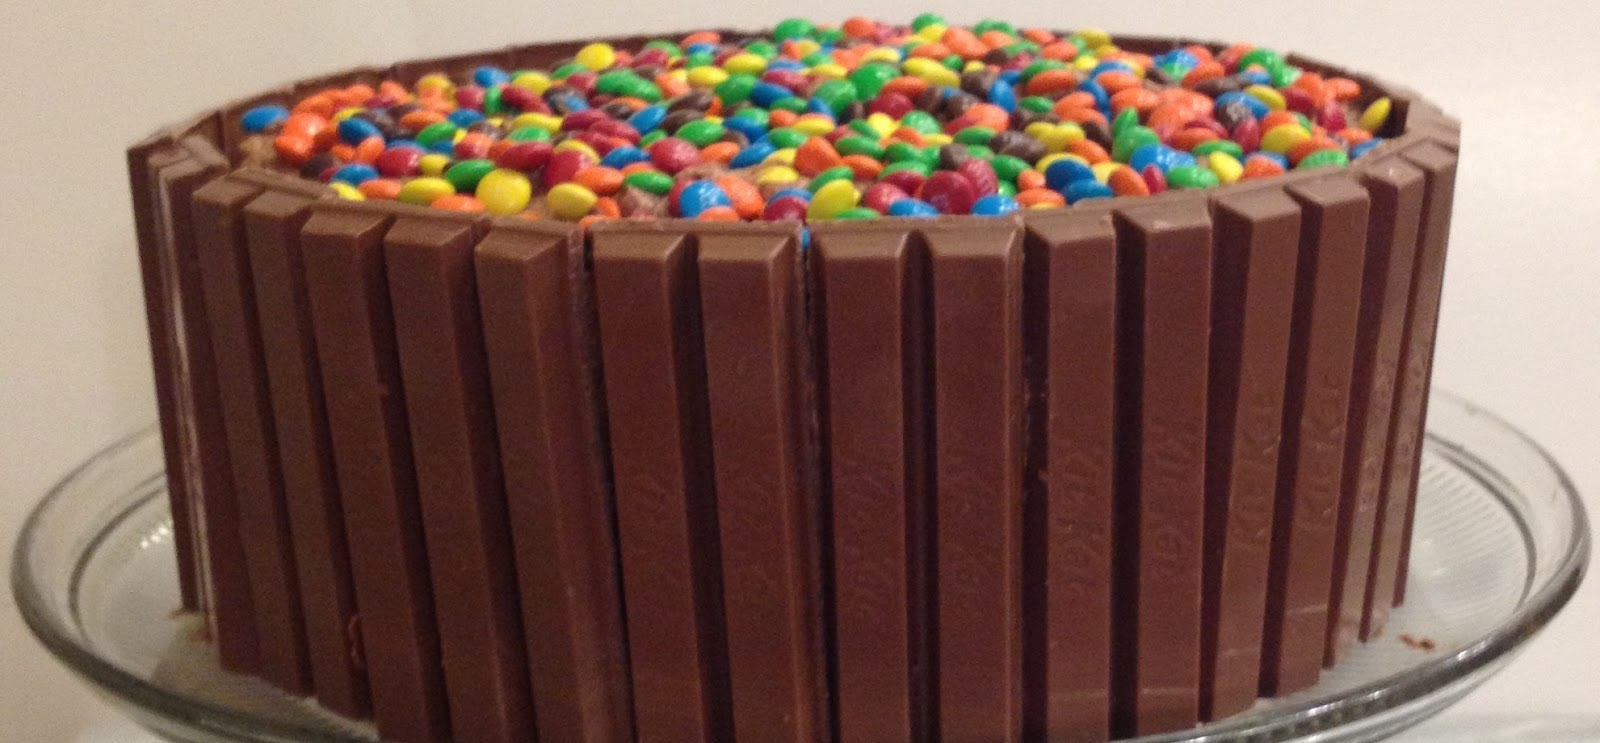
Let's face it, this looks awful! Because I wasn’t as patient as I should have been when waiting for my ganache to cool to a whip-able temperature, the ganache became a separated mess. Fortunately, it still tasted good. I made this particular cake for teacher appreciation week at school. The cake looked like such a disaster, I knew I couldn't bring it to the luncheon in it's current state. Luckily, I had another trick up my sleeve. This kit kat cake turned my mistake into a jaw-dropping centerpiece. Thank goodness for Pinterest.

All it took was 11 full-sized kit kat bars . . .
I always buy extra candy because some bars invariably break before they make it to the cake

2 cups of mini M&M candies . . .
Trust me on the mini M&Ms large ones look great, but they aren't as fun to eat

Some colored card stock, a few inches of bakers twine and two skewers
Ta Da! Impressive cake. Crisis averted.

Tuesday, June 23, 2015

Chocolate Cake

This Cake made with pantry staples is so much better than a boxed mix, you’ll never to go back.


The Do-Little Tribe has eight members. Which means a minimum of birthday eight celebrations. Sometimes the birthday and the party are on different days. For some reason, the Tribe members have been able to convince me that each celebration requires a cake. In addition, I volunteer to make birthday cakes for my friends. It seems that I make cake pat least once month. That’s a lot of cake. I’m not always the most efficient time manager and have often been caught the without a cake mix in the house. Luckily, my mother-in-law came to my rescue with a simple and delicious chocolate cake recipe. As an added bonus, my 8 inch round pans are too small for the entire mix, which compels me to make 6 cupcakes every time I bake a cake. Which makes my six little Tribe members very happy. It is made from ingredients I always have on hand, which makes me happy. And - let's face it - when the cook is happy, the food tastes better.

Step One: In a large bowl, combine the dry ingredients (flour, sugar, cocoa, baking powder and salt). Whisking thoroughly.
A wire whisk is the best tool for thoroughly mixing the dry ingredients.

 Step Two: Add milk, oil and hot water. Using an electric mixer, mix for 2 minutes.


Step Three: Add the eggs and vanilla. Mix 2 more minutes.
I am lucky enough to have a supply of organic, farm-fresh eggs.
Step Four: Pour into two well-greased and floured 9” pans or two 8” pans plus 6 cupcakes

The batter will be thinner than a cake mix. Don't worry, the end product will be fantastic.


Step Five: Bake in a 335 degree oven for 30 - 35 minutes (until a toothpick inserted into the middle of the cake comes out clean.)
Step Six: Let cool in the pans 5 min. Turn out of pans and cool completely on wire racks.
Step Seven: Frost with your favorite chocolate icing, ganache or buttercream frosting.
Step Eight: Graciously accept the compliments that are bound to come your way.


If you are using 8" cake pans, be sure to fill 6 cupcake cups first . . . unless you enjoy cleaning your oven.


Chocolate Cake Recipe
2 c. flour
2 c. sugar
1 c. cocoa powder
2 tsp. baking soda
1 tsp. baking powder
1 tsp. salt
1 c. oil
1 c. milk
1 c. hot water
2 eggs
1 tsp. vanilla

In a large bowl, combine flour, sugar, cocoa, baking soda, baking powder and salt. Using a wire whisk, mix until combined.
Add the oil, milk and water using an electric mixer, beat on medium speed for 2 min.
Add the eggs and vanilla. Mix for 2 more min.
Pour batter into desired pans. Make sure they have been generously greased and floured.
Bake in a 335 degree oven for 25 - 35 min. (when a toothpick inserted into the middle comes out clean)
Let cool in pan(s) for 5 min before turning on to a wire rack to cool completely.

*Note: This recipe makes one large 9"x13" cake, two 9" round cakes, two 8" round cakes plus 6 cupcakes or 30 - 36 cupcakes.

Tuesday, June 16, 2015

Lemon-Herb Chicken

Baked or Grilled, this easy marinade and cooking method make this meal a crowd pleaser.


I live in a place that has two seasons: Winter and August. When the weather is warm enough for me to break out flips flops and t-shirts, the last thing I want to do I spend hours in the kitchen. Mealtime - something I spend hours preparing for and thinking about in the winter months - becomes an exercise in speed. I serve quick and easy meals that require a minimum amount of indoor activity. That is why we end up eating a lot of bean burritos and quesadillas. On occasion, the Do-Little Tribe begs for a more substantial meal. When that happens, I turn to a favorite summer staple: Lemon-herb chicken. It is the ideal companion to Perfect Pistachio Pesto


Sadly, this dish requires a little planning. Luckily, not much. Chicken is a great meat to marinate because it soaks up the flavor quickly. I prefer to marinate overnight but when outdoor activities get in the way, 30 minutes is usually enough to make this meal tasty.


It’s amazing what three simple ingredients can do. Counting the marinating time, this meal can be made in less than an hour. Leaving me plenty of time for outdoor fun.


As an added bonus, this meat can be cooked two ways: baked or grilled. I love the smoky flavor of grilled meat. But sometimes grilling isn’t a viable option. When that happens, I cook the chicken in the oven.


Step One: Trim the chicken. Trimming away fat and cutting the breast to an even thickness.
An even thickness will speed cooking and marinating time

Step Two: Add lemon juice and olive oil. Marinate and Wait. At least 30 minutes, no more than 4 hours.

Step Three: Cook. This meat is excellent grilled or baked. Both choices are good ones.
To bake: Place the meat on a baking sheet generously greased with olive oil (this prevents the meat from sticking the the pan). Sprinkle with seasoning mix. Bake 15 min. Turn the meat over sprinkle with more seasoning. Bake an additional 10 - 15 min. (until juices run clear)
To grill: Preheat the grill. When the temperature is above 500 degrees, place the meat on the grill. Sprinkle with seasoning. Cook for 2 min, turn the chicken over. Season the other side, cook for 2 min. more. (This “sears” the meat. Cooking the outside quickly and keeping the juices inside.) Reduce the heat to medium and cook chicken 10 - 12 min. per side.


Step Four:  Let the chicken rest 15 min. before cutting. Enjoy
Two simple ingredients: one great dish


Lemon-Herb Chicken
Serves 4


1 ½ lbs. Boneless, skinless chicken breast
½ c. Lemon juice
2 Tbs. Olive oil
1 ½ tsp. Salt-free seasoning (I prefer Mrs. Dash)


Combine chicken, lemon juice and olive oil in a large zip-top bag. Refrigerate at least 30 minutes.


Place chicken on a sheet generously grease with olive oil. Sprinkle with seasoning. Bake in a 350 degree oven for 15 minutes, turn chicken over, season bake 15 minutes more.

Let meat rest 15 min. before slicing.

Tuesday, June 9, 2015

Perfect Pesto

Grilled cheese sandwich made with homemade mozzarella and perfect pesto

I love warm weather. I can’t stand to be cold. I think that is why I spend so much time in the kitchen during the cold months. I bake to stay warm. Once the snow melts, the flowers bloom and the sun shines, I want to be outside. When the weather warms up, my kitchen time is cut short by weeding, swimming, picnics and other outdoor activities. I still want to have delicious food, but it needs to be something that can be quickly made and enjoyed at any temperature. Pesto is the perfect summer food. It can be served hot or cold and the delicious herb flavor is perfect for a summer meal. It can be eaten as a main dish or a side dish for lemon-herb chicken. It is also a great way to use the basil plant that grows inches every day as it basks in the hot sunshine.


Quick, simple and yummy. That’s my kind of meal.


Step One: In a blender or food processor, place 2 cloves of peeled garlic and pulse until finely chopped.


Step Two: Add fresh basil. About 2 ½ c. of tightly compacted leaves and stems (if desired) and parmesan cheese. Blend until finely chopped. Add the nuts. Most recipes call for pine nuts, you can substitute nearly any kind of nut, if you wish. The Do-Little Tribe loves the flavor that roasted, salted pistachios add to the dish.
Fresh Basil basking in the sun. Basil is an essential ingredient in the prefect pesto.
I use the leaves and some of the stems in my pesto. For best results, use tender, non-woody stems


Step Three: Puree until the ingredients form a paste.


Step Four: With the motor running, pour the olive oil in a steady stream until the mixture is creamy and emulsified.

The perfect pesto ready to eat.
The finished product 


Step Five: Enjoy
Use right away by mixing it into cooked pasta, spreading it on sandwiches, as a dip, on top of steamed vegetables, or any other way you’d like. Store unused pesto in the refrigerator, tightly covered. Pesto tends to oxidize (like guacamole), The flavor is still excellent even if the color is a little dark.


Pesto Recipe


2 cloves garlic, peeled
2 ½ c. basil
¼ c. parmesan cheese
⅓ c. pistachio nuts
½ c. olive oil

In a food processor or blender, place the garlic and pulse until blended.
Add washed basil leaves and cheese.
Add pistachio nuts.
Blend until a paste forms.
With the motor running, pour the olive oil in a steady stream until the mixture is creamy and emulsified.
Store any unused pesto tightly covered in the refrigerator.

Tuesday, June 2, 2015

Aromatic Basmati Rice

The perfect companion to Chicken Tikka Masala

Aromatic Basmati Rice is wonderful with Tikka Masala


Feeding a large family often involves hearing a lot of complaining. Every member of the Do-Little Tribe has strong opinions about what makes food worth eating. Some tribe members "don't enjoy cheese," others complain about mushrooms. Peas are offensive. Green beans are “shelled” and only the seeds are worthy of consumption. Do-Little tribe members who turn noses up at peanut butter sandwiches ("I don't eat chunky peanut butter") will beg for sushi - with a crunchy fried onion topping. Apparently, lunch meat is only acceptable on alternate Thursdays when the moon is waxing . . . but not waning . . .  or full. And who can forget the time when a perceived molecule of egg on toast caused vomiting? (I promise, no eggs were allowed near that particular piece of toast.)


Even though I have many picky palates to please, some meals seems to make everyone happy. Rice is one of the things everyone will eat. Sometimes a meal deserves more than plain, white rice. Exotic main dish flavors demand a more sophisticated partner on the plate. I love to spice up the rice that accompanies Chicken Tikka Masala. The subtle cinnamon flavor makes the dish extra delicious. Plus, it couldn’t be easier to make. Just add a cinnamon stick to the rice and water. I love the comforting aroma that fills my home as it steams. I usually use basmati rice because I like the long grains with the tikka masala. But any rice can be used. If you chose a different variety, be sure to use the correct water to rice ratio (directions will be on the package).


Aromatic Basmati Rice


1 c. basmati rice
1 ½ c. water
cinnamon stick


Rice cooker directions:


Place rice, water and cinnamon stick in rice cooker, cook on white rice setting.


Stove top directions:


In a medium-sized sauce pan boil water. When water is at a full boil, add rice and cinnamon stick, stir once. Cover pan with tight-fitting lid and turn heat to low. Simmer 20 min. Remove from heat and let the pan sit for 5 min more.

Remove cinnamon stick and serve.

Tuesday, May 26, 2015

Chicken Tikka Masala

The delicious aroma and creamy texture make this meal a crowd pleaser


I’m an not a world traveler. In fact, my passport currently has zero stamps on it. Sad, I know. I plan to fix that soon. (Look for posts from Europe in a few months.) Until then, I can bring exotic flavors into my own home. Tikka Masala, the classic Indian dish, is a Do-Little Tribe favorite. Even though the list of ingredients is long, most of them are spices I usually have on hand. With a little planning (for meat marinating), I can have dinner on the table in about 30 min.

To make this recipe less daunting, I have broken it into seven easy steps.


Step One: Create the Marinade Combine the yogurt, lemon juice and spices in a gallon-sized zip-top bag. Knead the bag thoroughly to combine the ingredients. 
Measured and ready for the marinating bag

Add yogurt to the lemon juice and spices


Step Two: Add the meat Start by marinating the meat. I like to use chicken, but any meat can be used. Cut the meat into bite-sized pieces. Add it to the bag. Once again, knead the bag to ensure the meat is evenly coated. 

Step Three: Wait Let the meat marinate in the refrigerator for at least 30 min. (I have left it for as long as 48 hours. Be sure you check the expiration date on the meat. You do not want to serve salmonella.)


It isn't a very pretty color, but it smells so good.
Step Four: Bake Spread the meat on a baking pan and place on a rack close to the top of the oven. Broil on high until the meat is cooked and begins to brown in places. (15 - 20 min) Remove from oven.
Baked chicken nearly ready for the sauce. 
Step Five: Make the Sauce While the meat is cooking, prepare the sauce. The Hungry Tribe loves the rich, spicy flavor the sautéed jalapeño adds to the dish. It can be left out. But trust me, you will be glad you included it.
Once the spices hit the pan, my entire kitchen fills with the most delicious and comforting aroma. Then add the tomato sauce and the Hungry Tribe members begin congregating in the kitchen asking if it’s time to eat. Next add the cream.
Jalapeño, garlic and spices ready for tomato and cream


Step Six: Mix it up
Then the meat is added. The pan will be full of drippings, you don’t want that in your final product. Use a slotted spoon to transfer the meat from the baking sheet to the sauce pan. Mix thoroughly.


Step Seven: Serve over rice. (We love Aromatic Basmati Rice). Garnish with cilantro, if desired.
Enjoy


Chicken Tikka Masala Recipe


Serves 4 - 6
Marinade
1 c. plain yogurt
2 Tbs. lemon juice
2 tsp. cumin
½ tsp. black pepper
1 ½  tsp. cinnamon
1 tsp. salt
½  tsp. ground ginger
dash cayenne pepper*
1 ½  lbs. boneless chicken cut into bite-size pieces (thighs are a more tender meat but breast meat is still delicious)
After combining all ingredients in a gallon-size zip-top bag, seal bag and knead the mixture together by hand. Allow
chicken to marinate at least 1 hour in refrigerator. (Can be left in the bag all day or overnight.)
Place the chicken and marinade on a baking sheet and broil on high until the chicken is cooked - about 12 min.  Marinade will be thick. Do not worry, it will cook off. You do not need to save the drippings.
*Note: If you like your tikka masala extra spicy, add up to 1 tsp. cayenne pepper to the marinade.


While the chicken is cooking, assemble the sauce:
Sauce
1 Tbs. butter
1 ½  tsp. minced garlic
½  jalapeño, minced (optional)
2 tsp.  ground coriander
1 tsp. ground cumin
1 tsp. paprika
1 tsp. garam masala *
½  tsp. salt
1 (8 oz.) can tomato sauce
1 c. whipping cream


Melt butter in a large skillet, add garlic and jalapeño. Cook 1 minute. Add coriander, cumin, paprika, garam masala,
and salt. Add tomato sauce and cover skillet. Simmer 15 minutes. Add cream and simmer until sauce thickens, about 5 min. Add cooked chicken to sauce; simmer an additional 5 minutes. Serve over aromatic basmati rice. Garnish with cilantro.
*Note: Garam masala is a traditional Indian spice. Most grocery stores carry it. It can be left out of you cannot find it. But the flavor is worth the effort.